(2024.10.27. 수정됨.)
본 글은 디스토리 사용방법을 통해 장고 프로젝트를 생성한 상태라는 가정 하에 진행됩니다.
디스토리 사용방법 확인하기
개인적으로 추천하는 서버는 아마존 라이트세일입니다.
그 이유는 서버 설정이 쉽고, 가격도 적절하기 때문입니다.
도메인 구매하기
티스토리 블로그는 티스토리 도메인을 할당받아 사용하는 것이 가능했지만, 웹사이트는 자신의 도메인을 사용해야 합니다.
따라서, 보유 중인 도메인 주소가 없다면 도메인 주소를 구매해야 합니다.
서버 연결 툴 설치하기
저는 서버 인스턴스에 연결할 때 ssh와 filezilla를 사용합니다.
- ssh 설치하기 : https://django.seolpyo.com/entry/27/
- filezilla 설치하기 : https://django.seolpyo.com/entry/26/
서버 인스턴스 생성하기
웹사이트를 배포(운영)하기 위해서는 웹사이트를 운영할 서버 인스턴스가 필요합니다.
설표의장고는 일부 서버 인스턴스의 설정 방법을 제공합니다. 그렇지 않은 서버 인스턴스를 이용하는 경우 알아서 설정해야 합니다.
AWS 인스턴스 생성방법
- AWS 인스턴스 생성하기 : https://django.seolpyo.com/entry/28/
- AWS 고정 ip 연결하기 : https://django.seolpyo.com/entry/32/
443 포트 개방하기
https 연결을 위해 443 포트를 개방해야 합니다.
- AWS 인스턴스 443 포트 개방 방법 : https://django.seolpyo.com/entry/34/
서버 기초 세팅하기
apt updgrade
apt update와 upgrade를 실행하고, 파이썬 가상환경을 생성해줍니다. 가상환경을 실행한 다음 nginx, gunicron을 설치하고 장고 프로젝트를 위한 파일과 폴더를 생성합니다.
python 3.10 버전 이상이 필요하기 때문에 python3 -V 명령어로 설치된 파이썬 버전을 확인합니다.
>> sudo apt update
>> sudo apt upgrade -y
>> python3 -V
※ 2024.10.27 기준 아마존 라이트세일 인스턴스(우분투 24.04 LTS)에는 파이썬 3.12 버전이 기본값으로 확인됩니다.
가상환경 생성하기
가상환경 생성을 위해 sudo apt install python3.12-venv -y 명령어를 실행한 다음, root 경로에 django라는 이름의 가상환경을 생성합니다.
현재 경로가 root 경로라면 ls 명령을 통해 현재 경로에 존재하는 파일 목록을 확인할 수 있습니다.
>> sudo apt install python3.12-venv -y
>> python3 -m venv ~/django
>> ls
nginx와 gunicorn 설치하기
. ~/django/bin/activate 명령으로 가상환경을 실행한 다음, nginx와 python3-certbot-nginx, gunicorn을 설치합니다.
>> . ~/django/bin/activate
(django) >> sudo apt install nginx -y
(django) >> sudo apt install python3-certbot-nginx -y
(django) >> pip install gunicorn
dstory 패키지 설치하기
dstory 패키지를 설치를 통해 서버 인스턴스에 django와 기타 필요한 파이썬 패키지를 설치합니다.
(django) >> pip install seolpyo-dstory기초 파일 생성하기
mysite directory(폴더)를 생성하고, mysite.env, mysite.service 파일을 생성합니다.
(django) >> mkdir ~/mysite
(django) >> nano ~/mysite.env
(django) >> sudo nano /etc/systemd/system/mysite.service
mysite.env
mysite.env에는 다음 내용을 입력 한 다음, (Ctrl) + (X) => (Y) => (Enter) 키를 순서대로 입력해 저장합니다.
# ~/mysite.env

DJANGO_SETTINGS_MODULE=config.settings.prod
mysite.service
mystie.service 파일은 다음 내용을 입력 후 저장합니다. 저장 방법은 mysite.env와 동일합니다.
# /etc/systemd/system/mysite.service

[Unit]
Description=gunicorn daemon
After=network.target

[Service]
User=ubuntu
Group=ubuntu
WorkingDirectory=/home/ubuntu/mysite
EnvironmentFile=/home/ubuntu/mysite.env
ExecStart=/home/ubuntu/django/bin/gunicorn \
--workers 2 \
--bind unix:/tmp/mysite.sock \
config.wsgi:application

[Install]
WantedBy=multi-user.target
mysite.service 자동 실행 설정하기
sudo systemctl start mysite.service 명령어를 입력해 서버가 재부팅되는 경우 알아서 실행되도록 설정합니다.
(django) >> sudo systemctl enable mysite.servicenginx 설정하기
(django) >> sudo nano /etc/nginx/sites-available/mysite다음 내용을 입력한 다음 저장합니다. 저장 방법은 mysite.env와 동일합니다.
server_name의 값은 {연결할.도메인.주소} 부분을 자신이 사용할 도메인 주소로 변경해서 입력해야 합니다.
# /etc/nginx/sites-available/mysite

server {
  listen 80;
  charset utf-8;
  server_name {연결할.도메인.주소};
  # server_name django.seolpyo.com; # 입력예시
  location = /favicon.ico { access_log off; log_not_found off; }
  location /static {
    alias /home/ubuntu/mysite/static;
  }
  location /media {
    alias /home/ubuntu/mysite/media;
  }
  location / {
    include proxy_params;
    proxy_pass http://unix:/tmp/mysite.sock;
  }
}
nginx 재시작하기
다음 명령어를 순서대로 입력해 nginx를 재시작합니다.
(django) >> sudo rm /etc/nginx/sites-enabled/default
(django) >> sudo ln -s /etc/nginx/sites-available/mysite /etc/nginx/sites-enabled/
(django) >> sudo gpasswd -a www-data ubuntu
Adding user www-data to group ubuntu
(django) >> sudo systemctl restart nginx
장고 프로젝트 설정
prod.py 작성하기
컴퓨터에 저장되어있는 장고 프로젝트(mysite 폴더)의 config > settings폴더에 prod.py를 생성하고, 다음과 같이 작성합니다.
마찬가지로 {연결할.도메인.주소} 부분은 자신이 실제로 사용할 도메인 주소를 입력합니다.
# mysite > config > settings > prod.py
from . import *
ALLOWED_HOSTS = [{연결할.도메인.주소}]
# ALLOWED_HOSTS = ['django.seolpyo.com'] # 입력 예시
DEBUG = False
STATIC_URL = 'static/'
STATICFILES_DIRS = []
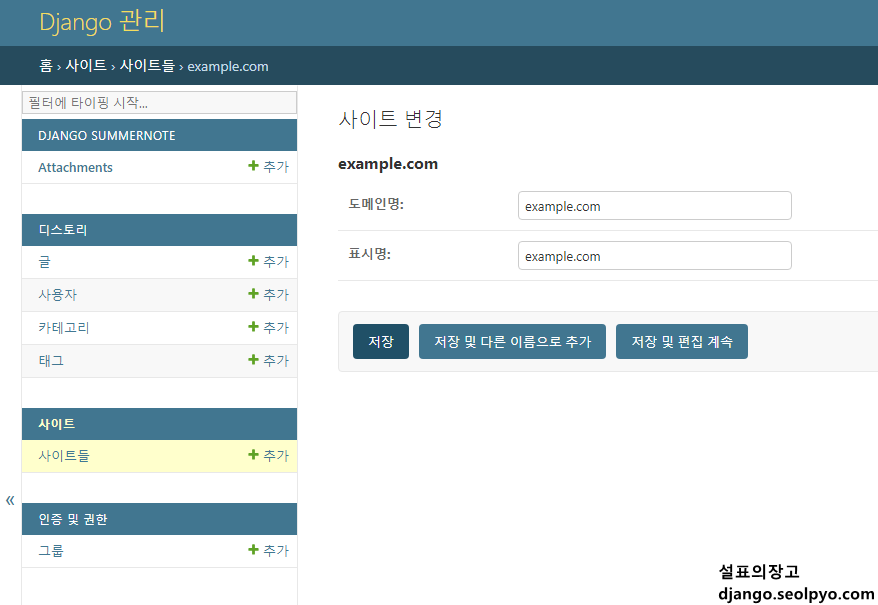
STATIC_ROOT = BASE_DIR / 'static/'사이트 변경하기
장고 프로젝트를 실행한 다음, http://127.0.0.1:8000/admin/sites/site/ 페이지로 이동한 다음, 표시명과 도메인명을 example.com에서 사이트에 연결하려는 도메인으로 변경합니다.
이 설정은 사이트맵에 표시되는 도메인에 사용되기 때문에 색인에 영향을 줍니다.
서버에 업로드하기
filezilla를 이용해 컴퓨터의 mysite 폴더에 존재하는 모든 파일을 서버 인스턴스에 생성해둔 mysite 폴더로 업로드합니다.
도메인 연결하기
사이트에 연결할 도메인을 서버 인스턴스의 고정 ip로 설정합니다.
설표의장고는 일부 도메인 호스팅 업체의 DNS 설정 방법을 제공합니다. 그렇지 않은 도메인 호스팅 업체를 이용하는 경우 알아서 설정해야 합니다.
- 고대디 DNS 관리 방법 : https://django.seolpyo.com/entry/30/
collectstatic
ssh를 통해 서버 인스턴스에 접속한 다음, 다음 명령어를 입력합니다.
>> ~/django/bin/python ~/mysite/manage.py collectstatic --settings=config.settings.prod만약 다음과 같이 Type 'yes' to continue, or 'no' to cancel 라는 입력을 요구하는 문구가 나오면 yes를 입력합니다.
>> ~/django/bin/python ~/mysite/manage.py collectstatic --settings=config.settings.prod

You have requested to collect static files at the destination
location as specified in your settings.

This will overwrite existing files!
Are you sure you want to do this?

Type 'yes' to continue, or 'no' to cancel:  yes

194 static files copied to '/home/ubuntu/mysite/static'.
https 설치하기
도메인 연결 확인하기
웹브라우저를 열고 "http://{연결한.도메인.주소}"를 입력해 접속이 되는지 확인합니다.
접속이 되지 않는다면 도메인이 서버 인스턴스에 연결될 때까지 기다린 다음, 다음 과정을 따릅니다.
보통 5~10분 이내에 연결됩니다.
ssl 인증서 설치하기
https 연결을 하려면 ssl 인증서를 발급받아야 합니다.
ssh를 통해 인스턴스 서버에 접속한 다음, 다음 명령어를 입력합니다.
{연결한.도메인.주소}는 앞서 nginx 설정에서 server_name으로 등록한 도메인 주소여야 합니다.
>> sudo certbot --nginx -d {연결한.도메인.주소}ssl 인증서 설치 과정 예시
위 명령어를 입력하면 다음과 같은 문구들을 확인할 수 있습니다.
(django) ubuntu:~$ sudo certbot --nginx -d dstory.seolpyo.com
Saving debug log to /var/log/letsencrypt/letsencrypt.log
Enter email address (used for urgent renewal and security notices)
 (Enter 'c' to cancel): aaa@aaa.com

- - - - - - - - - - - - - - - - - - - - - - - - - - - - - - - - - - - - - - - -
Please read the Terms of Service at
https://letsencrypt.org/documents/LE-SA-v1.4-April-3-2024.pdf. You must agree in
order to register with the ACME server. Do you agree?
- - - - - - - - - - - - - - - - - - - - - - - - - - - - - - - - - - - - - - - -
(Y)es/(N)o: y

- - - - - - - - - - - - - - - - - - - - - - - - - - - - - - - - - - - - - - - -
Would you be willing, once your first certificate is successfully issued, to
share your email address with the Electronic Frontier Foundation, a founding
partner of the Let's Encrypt project and the non-profit organization that
develops Certbot? We'd like to send you email about our work encrypting the web,
EFF news, campaigns, and ways to support digital freedom.
- - - - - - - - - - - - - - - - - - - - - - - - - - - - - - - - - - - - - - - -
(Y)es/(N)o: n

Account registered.
Requesting a certificate for dstory.seolpyo.com

Successfully received certificate.
Certificate is saved at: /etc/letsencrypt/live/dstory.seolpyo.com/fullchain.pem
Key is saved at:         /etc/letsencrypt/live/dstory.seolpyo.com/privkey.pem
This certificate expires on 2024-10-29.
These files will be updated when the certificate renews.
Certbot has set up a scheduled task to automatically renew this certificate in the background.

Deploying certificate
Successfully deployed certificate for dstory.seolpyo.com to /etc/nginx/sites-enabled/mysite
Congratulations! You have successfully enabled HTTPS on https://dstory.seolpyo.com

- - - - - - - - - - - - - - - - - - - - - - - - - - - - - - - - - - - - - - - -
If you like Certbot, please consider supporting our work by:
 * Donating to ISRG / Let's Encrypt:   https://letsencrypt.org/donate
 * Donating to EFF:                    https://eff.org/donate-le
- - - - - - - - - - - - - - - - - - - - - - - - - - - - - - - - - - - - - - - -
(django) ubuntu:~$
서버 재부팅
서버를 재부팅합니다.
1~2분 정도 기다리면 서버가 재부팅됩니다.
>> sudo reboot접속해보기
서버가 재부팅되었다면 웹브라우저를 연 다음, 장고 프로젝트에 연결한 도메인 주소(https://{연결한.도메인.주소})로 접속해봅니다.
이제부터 자신만의 웹사이트를 이용할 수 있습니다.
이 글의 댓글 기능은 일부러 막아놓았습니다. 궁금한 내용이 있다면 게시판을 이용해주세요!